
nv_timeline
User guide
This page refers to the latest nv_timeline release. You can open it with Help > Timeline plugin Online help.
The plugin adds a Timeline entry to the novelibre Tools menu,
a Create from Timeline… to the File > New submenu,
and a Timeline plugin Online Help entry to the Help menu.
The Toolbar gets a  button.
Command reference
Tools > Timeline > Information
Show information about an existing Timeline project, if any. Timeline and novelibre file dates are compared.
Tools > Timeline > Create or update the timeline
If a timeline exists, update it from novelibre, otherwise create a new timeline.
Tools > Timeline > Update the project
Update the novelibre project from the timeline, if existing.
Important
Please make sure to save the timeline before trying to sync with novelibre. Since nv_timeline reads the .timeline file, unsaved changes may not be recognized. In case of doubt, close Timeline before syncing with novelibre.
Tools > Timeline > Open Timeline
Same as clicking on the button on the toolbar.
Open the project’s timeline, if existing, with the Timeline application. Depending on the configuration (see below), the project is automatically locked.
File > New > Create from Timeline…
Open a file dialog to select a timeline. If no novelibre project with the timeline’s file name exists, create a new one from the timeline.
Hint
To become sections in novelibre, Timeline Events need a “Section” label.
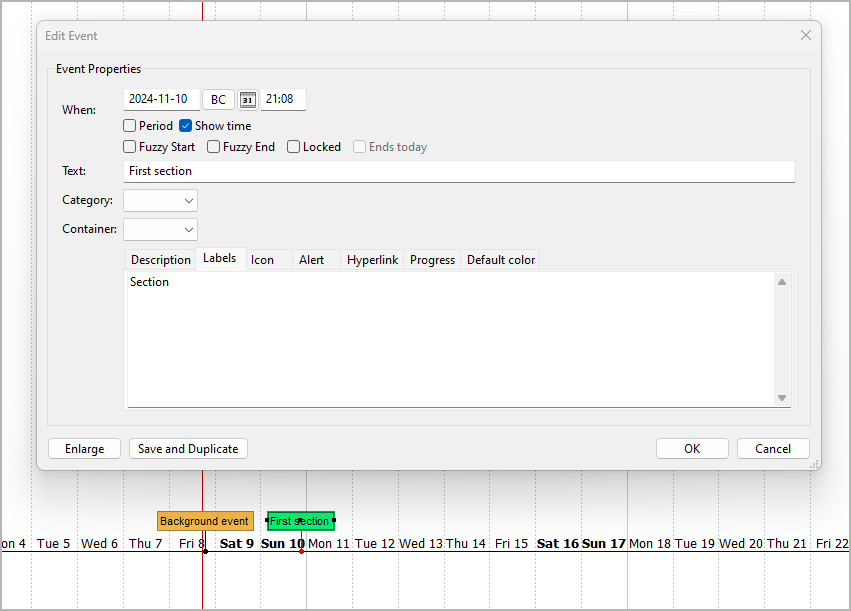
The idea behind this is that only selected events should be included as sections in the novelibre project. There may also be background events, for example, that should not be synchronized.
Custom configuration
You can override the default settings by providing a configuration file. Be always aware that faulty entries may cause program errors or unreadable Timeline projects. If you change a configuration inbetween, previously synchronized projects might no longer match.
Global configuration
An optional global configuration file named nv_timeline.ini
can be placed in the configuration directory of the installation.
It is applied to any project.
Its entries override nv_timeline’s built-in constants.
This is the path under Windows:
c:\Users\<user name>\.novx\config\nv_timeline.ini
Local project configuration
An optional project configuration file named nv_timeline.ini
can be placed in your project directory,
i.e. the folder containing your novelibre and Timeline project files.
It is only applied to this project.
Its entries override nv_timeline’s built-in constants as
well as the global configuration, if any.
How to provide/modify a configuration file
You find the a sample configuration file with the nv_timeline default values in the novelibre installation directory under
c:\Users\<user name>\.novx\nv_timeline_sample\
You best make a copy and edit it.
The SETTINGS section comprises the program “constants”. If you change them, the program might behave differently than described in the documentation. So only touch them if you are clear about the consequences.
Comment lines begin with a
#number sign. In the example, they refer to the code line immediately above.
This is the configuration file explained:
[SETTINGS]

section_label = Section

# Events with this label become sections in a newly created
# novelibre project.

section_color = 170,240,160

# Color for events imported as sections from novelibre.

new_event_spacing = 1

# Days between events with automatically generated dates.


[OPTIONS]

lock_on_export = No

# Yes: Lock the novelibre project when opening the timeline.
# No: Do not lock the novelibre project when opening the timeline.
How to reset the configuration to defaults
Just delete your global and local configuration files.
Conventions
General
The novelibre project file and the Timeline file are located in the same directory.
They have the same file name and differ in the file extension.
Either a timeline or a novelibre project is generated from the other file for the first time. After that, the two files can be synchronized against each other.
Caution
Synchronizing means overwriting target data with source data. Since nv_timeline works in both directions, there is always a danger of confusing source and target, thus losing changes. So if the program asks you for confirmation to overwrite a file, better check if it’s actually the target file.
On the novelibre side
Only normal sections are synchronized with Timeline, or exported to Timeline. Unused sections will not show up in the timeline.
Sections with an unspecific time stamp (day, hours, minutes) are synchronized with the timeline, if a reference date is set.
Changes to the section date/time affect the event start date/time during synchronization.
Changes to the section duration affect the event end date/time during synchronization.
Changes to the section title affect the event text during synchronization.
Changes to the section description affect the event description during synchronization.
Changes to the section type may add or remove the corresponding event during synchronization.
Adding or removing sections will add or remove the corresponding event during synchronization.
On the Timeline side
A section ID is a string looking like “sc1”. It is auto-generated and must not be changed manually.
Only events with a label containing the string “Section” (user input) or a section ID (auto-generated) are exported as sections to a new novelibre project.
When creating a new novelibre project from a timeline the first time, “Section” labels are replaced with section ID labels.
If a new novelibre project is generated again with the same timeline, the section ID labels may change.
Only events with a label containing a section ID are synchronized with an existing novelibre project.
Changes to the event end date/time affect the section duration during synchronization.
Changes to the event start date/time affect the section date/time during synchronization.
Changes to the event text affect the section title during synchronization.
Changes to the event description affect the section description during synchronization.
The section structure of an existing novelibre project can not be changed in Timeline. Adding/removing events, or adding/removing section IDs from event labels will not add or remove the corresponding section during synchronization.
When creating events from sections without date/time information, the dates are automatically generated with a one-day difference, starting from the novelibre project’s reference date.
Known limitations
Section events that begin before 0001-01-01 in the timeline, will not be synchronized with novelibre, because novelibre can not handle these dates.
The same applies to the section duration in this case, i.e. the event duration in Timeline and the section duration in novelibre may differ.
If a section event ends after 9999-12-31 in the timeline, the section duration is not synchronized with novelibre.